The Keyboard of a Harpsichord
 It's hard to think of something much simpler than the keyboard of a harpsichord. It's a row of
simple wooden levers, nothing more. However, it is of major importance to a player: it is the
surface that the fingers touch, and it is directly in line between finger and string. And, it is an
area where modern harpsichord makers often go wrong. So, when I decided to improve the stiff
action of my Ross, I took some photos.
It's hard to think of something much simpler than the keyboard of a harpsichord. It's a row of
simple wooden levers, nothing more. However, it is of major importance to a player: it is the
surface that the fingers touch, and it is directly in line between finger and string. And, it is an
area where modern harpsichord makers often go wrong. So, when I decided to improve the stiff
action of my Ross, I took some photos.
The layout:
A harpsichord keyboard has to transition from 7 evenly-spaced naturals per octave at the front to 12 evenly-spaced
jacks per octave at the rear. Although the commonest width of an octave today is 165 mm, early instruments
varied from 174 for some Italian harpsichords to 156 for some Germans. My Ross is 159 mm, German size.
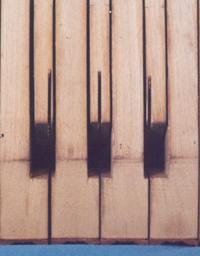
Construction begins with a glued-up piece of light stable wood the size of the entire keyboard, with grain running front
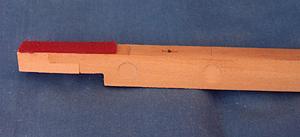
to back. After everything has been done that can be done with the key block in one piece, a uniform 7/octave
spacing is sawed in from one side as far as the ends of the sharp levers. (As you can see from the photo at right,
Ross should have used a cutting stop!) Then, a uniform 12/octave is sawed from the other side to just past
the pivot rail. Past the pivot rail, each saw line angles individually to transition from the 12/octave to
7/octave spacing. Finally, the fronts of the sharp levers are chiselled from the natural keys from underneath,
and the sharp key height extensions and key tops glued on.
Many modern keyboards are made so that a player's fingers can fit between the sharps - I've seen sharp
keys only 30% the width of the natural keys. That's because many piano players still copy the
Horowitz hand position, as I did when I was young.
But, a harpsichordist's fingers should stay very close to the key tops,
and move as little as possible to attain a cantabile sound - they should not wander up into the sharps.
The sharps are more comfortable to play, and closer to early keyboards, if they are 40-45% the width of the naturals.
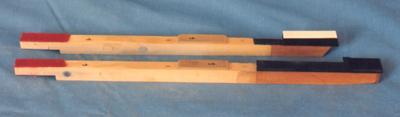
The key tops only need to be as long as a finger is thick, but since about 1500 have always been made much longer
for appearance. Ross made 40 mm naturals and 60 mm sharps - I shortened the sharps to 50 mm,
more usual for early harpsichords. (Some German instruments had sharps as long as 90 mm - long
sharps are not a modern aberration.)
The materials:
 Each key lever consists of a piece of wood about a centimeter square and 25 cm long for a single manual
instrument, up to 50 cm. long in a double manual. If one warps by even a millimeter, in any weather, it will
jam with the adjacent key. Given this demanding requirement, lime (Tilia vulgaris) and beech (Fagus silvatica)
were the usual choices of wood.
Each key lever consists of a piece of wood about a centimeter square and 25 cm long for a single manual
instrument, up to 50 cm. long in a double manual. If one warps by even a millimeter, in any weather, it will
jam with the adjacent key. Given this demanding requirement, lime (Tilia vulgaris) and beech (Fagus silvatica)
were the usual choices of wood.
Natural key surfaces were light colour (boxwood or ivory), sharps dark (ebony or rosewood, often stained black
with iron dissolved in acid), until well into the 17th century. For a few generations, fashion dictated the
reverse, ebony naturals and ivory sharps, but by the 18th century, light naturals and dark sharps had
returned to most harpsichords outside of France. Modern buyers, however, generally insist that harpsichord
naturals be dark and sharps light, to differentiate themselves from piano players (whom we all know are a
dime a dozen!) You will sometimes read that keyboards changed because of a shortage of ivory. However, most
keyboards used boxwood for the light-coloured surfaces, and there was no shortage of that.
Key surfaces must be smooth, so that a finger can slide off them.
With modern CITES restrictions on the use of ivory, bone is more common than in the past. Bone is porous, and
fingers stick to it, so it requires lubrication with a bit of lanolin or olive oil. Boxwood doesn't have this problem.
The pivot:
A lever requires a pivot point, about which it must rotate freely but precisely, in one plane only. Since
our universe comes equipped with three dimensions, a keyboard lever must be controlled by three elements.
A point must locate the lever so that it doesn't translate in any dimension, then two guides are required
to ensure that it doesn't rotate around any dimension other than the one desired - a vertical plane from
front to back for a harpsichord. Here is how harpsichord makers did it.
The key block was clamped, or nailed, to the keyframe, then holes the diameter of a polished metal pin were
drilled vertically
through the key block into the pivot rail. The top of the hole in the key block was enlarged from front to back
to form a slot with a V-shaped swage, then the hole cleaned out by rocking a pin firmly from front to back.
(Use a steel nail today - they are stronger than modern plated brass pins.) Now if a pin is tapped into the
pivot rail and a key placed on its pin, it will pivot on it - the slot stops the key from tipping from side
to side. Since wood is not removed to make the slot, if the pin later becomes loose, a drop of water will
re-expand the wood to permit repair.
Most modern makers, however, use the technique Ross did, which was developed by 19th-century piano makers:
holes in the key wood are drilled larger from the top so that only the bottom 2 mm of the holes remain
the pin diameter, then the pins tapped into the pivot rail. Next, a thin piece of hardwood (bushing) was
prepared with punched slots each the width of the pin, and glued to the top of the key block using the pivot
pins to locate it. The punch was often heated enough to scorch the wood, which would make it smoother.
This method is better suited to mass production with machinery than the old.
Sharp keys are shorter than naturals, so the pivot pins for sharps are placed to the rear of those for naturals
to keep the same lever ratio finger to jack. Then, to prevent the sharp keys from hitting the front edge of the
pivot rail, and natural keys the rear, small felt or cardboard bushings are placed on each of the pins, to
raise the pivot point slightly. Some early makers glued a thick string along the pivot rail halfway between
the two rows of pins instead.
To stop key rotation from side to side, one of three methods was used. The commonest old method was to saw
a vertical slot in a rear rail, then insert a metal pin (Flemish practice), or a thin piece of wood (Italian),
projecting from
the end of the key lever as in the drawing at right. This projection, sliding up and down in the slot,
completed the location of the lever. By the 18th century, another method appeared in France and England:
a slot in the key lever which engaged a second vertical pin, close to the jacks in France, under the
fingers in England. The third method was to have a thin vertical pin separating each key lever at the
rear - this was used for the upper manuals of some German instruments whose lowest keyboard used the
projecting pin method, and for some spinets. The rear through-the-key pin system that Ross used is
almost always used in modern keyboards, despite its rarity in early times - it's fast to do accurately
with a large drill press.
The forces involved in moving a key are small, especially in early actions with no lead, so friction must be
extremely low. The rear rail slot must be precisely in line with the desired key motion, and made very smooth.
A slot width of 1.2 mm matches standard flat jewellers' files, which do a good job of this. Another method
is to use a hot piece of metal to burnish the slot and wood pins. The newer vertical pin method relies on a
hard smooth plating working in softwood levers, and on pins that are parallel to drill-press precision to
achieve low friction.
As mentioned to start, however, the very last thing you do is to saw the keys apart - virtually all of key
making and laying out is best done while the key block is in one piece.
| |
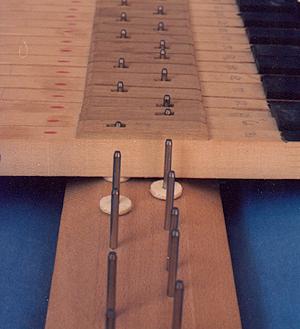
the row of pivot pins and bushings

the row of guide pins (and lead weights!)
the Flemish rear guide
|
Key dip control:
Each key must move vertically between two limits, the rest position (up) with jack dampers resting on the
strings, and the down position with the plectrum past the string. The rest position is provided by a thick
felt pad under the rear of the keys. Limitation of downward movement was done in one of several ways.
The only limit to movement of a surprising number of early keyboards seems to have been the jack hitting the
jack rail - a noisy occurrence even with a pad, which good players would have avoided by finger technique.
Flemish practice was to provide a second felt pad at the rear of the key levers and just above them,
facing down. It was fastened to the top of the slotted rail, which in turn is fastened
to the instrument bottom, as decoupled as possible from the soundboard. This provides a quiet
and well-defined stop, but one that is a pain to adjust! Some English and Italian instruments placed a pad
under the front of the keys to limit key dip. Many modern actions, including this one, use the lower jack
guide as the stop - a thick pad was glued on the key, reducing the directness of feel of the string
by the player. I replaced it with a thin felt layer on the key levers, then added a pair of set screws
under the keyboard rear rail to set the correct action depth.
Precise key dip control is important to touch, particularly for fast repetition of notes. To me, the ideal
is to have the key stopped a tiny bit before the jack is stopped by the jack rail. That way, the jack does
not bounce, and is not forced into the jack rail by a firm touch either. (Playing with the delicate touch
of François Couperin is not possible at the speed of Domenico Scarlatti!) But clearly, most early players
did not agree. Probably they did not mind the noise of jack on rail. I doubt that many spent longer developing
keyboard finger technique than we do today - few modern players play as many instruments as musicians of
the baroque were expected to.
Action weight:
 The choice of pivot point has a major effect on the feel of the keyboard. In general, early keyboards had a
pivot point closer to the fingers than center. Several surviving 16th-century Flemish instruments make their
2x8' jacks move 1.35 times as much as the finger. 1.2 or greater was common for Italian instruments. This
provides a shallow and crisp action. As time went on, the pivot point was moved to the rear, close to the midpoint,
which makes the action lighter but deeper. A 1:1 ratio is common in 18th-century keyboards, although
as high as 1.15 is found in some upper manuals of this time. Part of my aim in rebuilding mine was to make it
more responsive. I did it by adding a light spruce extension to the rear, then moving the keyboard forward
slightly - it's now about 1.15 for the main 8'.
The choice of pivot point has a major effect on the feel of the keyboard. In general, early keyboards had a
pivot point closer to the fingers than center. Several surviving 16th-century Flemish instruments make their
2x8' jacks move 1.35 times as much as the finger. 1.2 or greater was common for Italian instruments. This
provides a shallow and crisp action. As time went on, the pivot point was moved to the rear, close to the midpoint,
which makes the action lighter but deeper. A 1:1 ratio is common in 18th-century keyboards, although
as high as 1.15 is found in some upper manuals of this time. Part of my aim in rebuilding mine was to make it
more responsive. I did it by adding a light spruce extension to the rear, then moving the keyboard forward
slightly - it's now about 1.15 for the main 8'.
Almost all modern makers load their keys up with lead weights to make the action heavier. Ross used almost
4 kg of them! No early makers weighted their actions like this, in fact some hollowed out wood under
the naturals to make their actions even lighter than lime wood. Most actions benefit from removing some
of the lead in the levers, and all of it in the jacks. Ross used the common method of drilling holes
horizontally through the keys close to the jack end, then tapping in a slightly tapered precast lead plug.
As long as the thin side of the tapered plug is selected for tapping gently, they usually come out with no
complications. I replaced half of them with plugs of spruce, with grain oriented the same direction as the
key lever wood. The key levers should end up close to balancing without the jacks resting on them.
Early jacks typically weigh less than 5 g. This has a significant effect on the sound - a light jack gives
a soft damping of the string instead of the hard thud of many modern actions with thick dampers and heavy jacks.
A great deal of the sustain of early instruments comes from light damping and free sympathetic strings rather
than from the direct sound of the plucked string, especially in the Italian tradition. In the 18th century,
a few makers used a bit of lead in the jacks of upper manuals, to make them the same weight as the longer lower
manual jacks. The Boston plastic jacks used by Ross weigh 6 g, and are close to originals in weight and
behaviour given the tension on the strings.
The force required to depress a key is the net weight of the key and jacks plus the
force required to pluck the strings. The more resonant the instrument, the lighter and slacker
the strings can be, thus the lighter the action. The earliest instruments have keys and jacks that
are so light that the action force is almost entirely that required to pluck the strings - the feel is
as direct as that of a lute or harp. And, the pitch of the strings often was radically different
from the modern assumption that everything old was tuned to A=415. Flemish instruments in
particular were known to be of two types, and one (the keyboard-to-the-right muselar, and the
lower manual of Ruckers two manual instruments) was tuned as much as a fourth below
'normal' pitch. There is evidence of a corresponding Italian variation of pitch.
I am certain that it was unusual for a pre-19th century harpsichord to require a key force greater
than 150 g even on plein jeu, and that most required appreciably less. The high force
demanded by so many modern instruments is not based on history, but on the use of strings
longer than were used in the past at the pitch at which they are now sounded. My Ross had a
c'' length of 375 mm, far longer than could ever have been used until the manufacture of
modern carbon steel music wire, and a 2x8' plucking force of 160 g. So, I removed the top f# key
and moved the keyboard up a semitone, allowing the string tension to be reduced by 12%.
All these changes together, the plucking force is now 130 g, with a much cleaner, more
direct feel of the strings. And, the sound is noticeably richer with the lower string tension. It
took very little time, and nothing needed to be touched outside of the keyboard. Well worth while!
John Sankey 2000
other notes on instrument making